01/12/2015

Reinstallation pcduino et configuration du rover


(Update 07/01/2016)
un nouveau script d'installation qui reprend la procédure décrite dans cette page est dispo ici .


Si votre pcduinoBot plante, ou si vous posséder cette merveilleuse carte qu'est le pcduino et ne savez pas trop quoi en faire, je vous propose d'y installer les fonctionnalités regroupées sous le terme de pcduinoBot.


Vous pouvez repartir de zéro en suivant la procédure indiquée ci dessous :
- pour la partie technique, jetez un coup d'oeil là http://smag0.blogspot.fr/2014/03/rover-pcduino-introduction.html
- utilisation d'une carte pcduino V2, avec module wifi noir : commander le kit matériel complet ou seulement certaines parties

REINSTALLER LE SYSTEME :


- télécharger les images Kernel et Ubuntu ici : http://www.linksprite.com/image-for-pcduino2/
- les installer selon la procédure ici : http://www.mon-club-elec.fr/mes_downloads/doc_pcduino/3.pcduino_installation_maj_du_systeme_de_base.pdf ou là : http://learn.linksprite.com/pcduino/quick-start/steps-to-flash-ubuntu-images-to-pcduino/
ou la méthode plus rapide avec PhoenixSuit plus bas sur cette page.

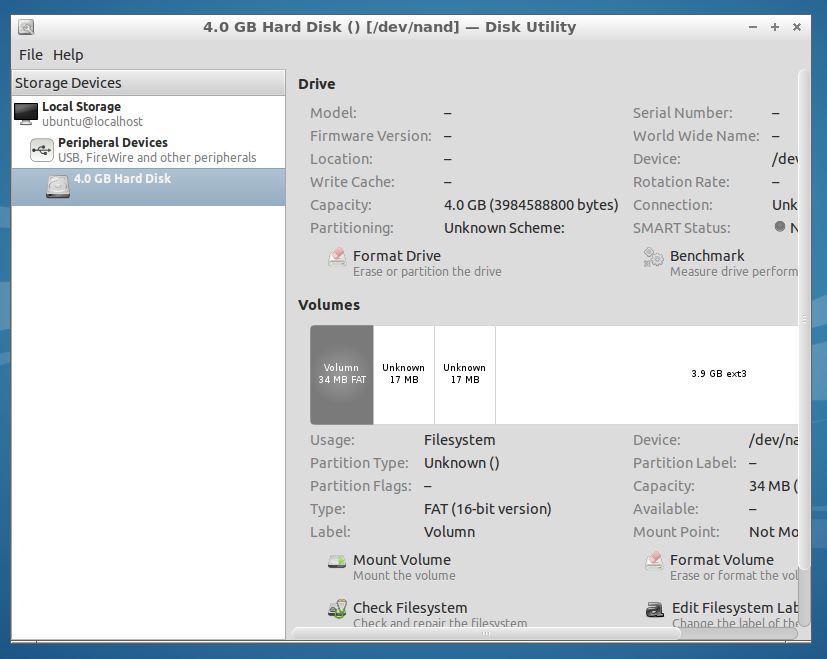
ACTIVER 4GB DE NAND SUR VOTRE PCDUINO

- http://learn.linksprite.com/pcduino/quick-start/how-to-use-the-4g-nand-flash-for-pcduino/
le lien mentionné ne fonctionne plus , mais dans les commentaires, y'en a un autre sur un site russe, pour vous éviter d'apprendre le russe, je l'ai mis là ... pour voir la taille de vos disques utilisez la commande "df -h"
avec la notice :
We prepared a script pcduino-nand-4g-fix to help you extend the space.You can download it, unpack it, and run: $chmod +x pcduino-nand-4g-fix $ sudo ./pcduino-nand-4g-fix it will output: partition  0: name =   bootloader, partition start =     2048, partition size =    65536 partition  1: name =          env, partition start =    67584, partition size =     4096 partition  2: name =         boot, partition start =    71680, partition size =    32768 partition  3: name =       rootfs, partition start =   104448, partition size =  3686400 partition  4: name =        UDISK, partition start =  3790848, partition size =  3991552 5 partitions check partition table copy 0: OK check partition table copy 1: OK check partition table copy 2: OK check partition table copy 3: OK ready to write new partition tables: partition  0: name =   bootloader, partition start =     2048, partition size =    65536 partition  1: name =          env, partition start =    67584, partition size =     4096 partition  2: name =         boot, partition start =    71680, partition size =    32768 partition  3: name =       rootfs, partition start =   104448, partition size =  7677952 4 partitions write new partition tables? (Y/N) y Press  “Y”  to confirm, the system will reboot automatically. After reboot, you will get full 4GB.
MJPG-STREAMER :

 - http://learn.linksprite.com/pcduino/install-mjpg-streamer-pcduino/, attention, erreur dans le lien de téléchargement, complétez avec ça : http://doc.ubuntu-fr.org/mjpg-streamer
- à lancer dans un terminal avec la commande


$ mjpg_streamer -i "/usr/local/lib/input_uvc.so -d /dev/video0  -y -r 320x240 -f 10" -o "/usr/local/lib/output_http.so -p 8090 -w /usr/local/www -p 8090"

ceci lance un serveur accessible à l'adresse http://127.0.0.1:8090 et diffuse en Streaming l'image de votre caméra branchée sur le port USB. On récupérera cette image ensuite, et on l'affichera ensuite avec le serveur python qui gérera les commandes.

Pour lancer la webcam au démarrage, ainsi que le serveur python du paragraphe suivant, éditez le fichier autostart en lançant la commande suivante :

$ sudo leafpad /etc/xdg/lxsession/Lubuntu/autostart

et ajoutez les deux lignes suivantes (la deuxieme est en fait une seule ligne ):

@python /home/ubuntu/smag0/serveur/serveur.py
@mjpg_streamer -i "/usr/local/lib/input_uvc.so -d /dev/video0  -y -r 320x240 -f 10" -o "/usr/local/lib/output_http.so -p 8090 -w /usr/local/www -p 8090"

POUR AVOIR UN JOLI SERVEUR PYTHON PERMETTANT DE COMMANDER NOTRE ROBOT PCDUINO :

installation de Flask : (http://flask.pocoo.org/)

$ sudo apt-get install python-pip python-dev build-essential 
$ sudo pip install --upgrade pip 


$ sudo pip install Flask

librairie Pyduino

Installer la librairie Pyduino pour l'accès aux PWM en mode analogique et contrôler la vitesse des deux moteurs à courant continu (DC). La taille de notre pcDuino étant comme nous l'avons vue, extensible... mais pas indéfiniment, on peut choisir de n'installer que la librairie est ses prérequis :

Attention la commande d'installation manuelle est à exécuter avec les droits admin : 
$ sudo ./install_pyduino.sh 


Téléchargez et décompressez le code du serveur python pour commander le pcduino rover et voir les images en streaming : le code du serveur est dispo ici 
corriger l'adresse http://192.168.XX.XX:8090 dans la page dimmer-light.html du repertoire template et mettez celle de votre pcduino

à décompresser dans le repertoire /home/ubuntu/smag0, et à lancer avec

$ cd /home/ubuntu/smag0/serveur
$ python serveur.py
vous devriez voir le lancement du serveur, celui-ci est ensuite accessible à l'adresse http://127.0.0.1:8080, ou par le réseau (récupérez l'adresse du pcduino avec un ifconfig, à ce moment , le mieux est d'attribuer une adresse ip fixe à votre carte pcduino, dans la configuration de votre box, ma box sfr le fait très bien, et j'imagine que la votre aussi.)
Il y a même possibilité de demander à votre box de router les entrées sur votre pcduino, afin de permettre de voir les images, ou déplacer votre pcduino rover depuis le bureau... ça fonctionne très bien, mais c'est juste en test, attention, je ne garanti pas la sécurité. c'est à vous de savoir quels ports vous ouvrez, à qui, comment...)

le résultat devrait être proche de ça :


voir aussi, ce qu'on peut faire avec nodejs : https://www.npmjs.com/package/pcduino
et/ou avec p5js : http://p5js.org/gallery/
p5js +nodejs + socket.io  -->  https://github.com/processing/p5.js/wiki/p5.js,-node.js,-socket.io

d'autres solutions pour monter un serveur web /socket sur le pcduino : http://indexerror.net/2492/bottle-autobahnpython-pcduino

INSTALLATION FUSEKI (OPTIONNEL)


INSTALLATION JENA


modifications à réintégrer dans le code du fichier dimmer-light.html de serveur.zip (repertoire templates): 
<div style="float:left">
<img id="snapshot" src="" class="rotate270"/>
<script> var loc=window.location.hostname;
loc+=':8090/?action=stream' ;
console.log(loc);
document.getElementById("snapshot").src="http://"+loc;
</script>
</div>

PCDUINO EN MODE HOPSPOT / POINT D'ACCES / ACCESS POINT / AP

j'ai testé ça, mais ça m'a planté la carte wifi http://blog.sip2serve.com/post/48899893167/rtl8188-access-point-install-script, mais on peut peut-être s'en inspirer, et mettre les paramètres de cette page, ou voir là : --> marche pas pour l'instant. ça a marché qd j'avais reçu mon pcduino, mais depuis qques mises à jours --> pb


LA BIBLE DU PCDUINO :
http://www.pcduino.com/wiki/index.php?title=Book

images pcduino : http://www.linksprite.com/image-for-pcduino2/

pour l'erreur (error) : Unable to connect to www.wiimu.com:8020:
-->It seems that the server has been closed.

Try this temporary source in your sources.list:


Reinstaller l'image du pcduino avec PhoenixSuit

(bien que cette page concerne le pcduino 3, fonctionne aussi avec mon pcduino2. plus rapide que de graver l'image sur SD.)

-brancher le pcduino au secteur
-brancher un autre cable sur la prise otg du pcduino 2
-appuyer sur upgrade puis un coup sur Reset, et Phoenixsuit envoi la mise à jour sur la carte.
-brancher ensuite une clé usb avec un fichier update.sh et  l'image d'ubuntu / ou du pcduino rover (page 64 : https://s3.amazonaws.com/pcduino/book/Rover+-+A+WiFi+Video+Surveillance+Remote+Robot++Powered+by+pcDuino.pdf)


NOTES RAPIDES

pcduino v2

- mettre le clavier en français :
infos pour éviter des galères : 
régler l'heure sur pcduino :  sudo ntpdate fr.pool.ntp.org 
régler le clavier en français : sudo setxkbmap fr

sudo board-config.sh
- configurer la carte avec "board-config" : http://www.mon-club-elec.fr/mes_downloads/doc_pcduino/3b.pcduino_utilitaire_board_config.pdf
- install de pip à rajouter dans le script de réinstall du rover : sudo apt-get install python-pip python-dev build-essential

```
Try this
sudo vi /etc/apt/sources.list
and then make sure uncomment the `wiimu.com' lines and add 'trusty-security / trusty-updates' sources as downbelow
deb http://ports.ubuntu.com/ubuntu-ports/ trusty main universe
deb-src http://ports.ubuntu.com/ubuntu-ports/ trusty main universe

deb http://ports.ubuntu.com/ubuntu-ports/ trusty-security main universe
deb-src http://ports.ubuntu.com/ubuntu-ports/ trusty-security main universe

deb http://ports.ubuntu.com/ubuntu-ports/ trusty-updates main universe
deb-src http://ports.ubuntu.com/ubuntu-ports/ trusty-updates main universe

# deb http://www.wiimu.com:8020/pcduino/ pcduino main
# deb-src http://www.wiimu.com:8020/pcduino/ pcduino main
then do 
sudo apt-get update
again, everything works well without annoying 'conflict' or 'pcduino-kernel error' blah blah
```

11/11/2015

Sphero-Carto

Le but de cet article est de proposer une utilisation du robot Sphero d'Orbotix pour établir la cartographie d'un environnement.
le code est disponible là : https://drive.google.com/file/d/0B0zEK4yLB5C6TUhLc0FRbVVKMVU/view?usp=sharing

En effet dans le projet Smag0, et d'après les trucs que j'ai pu lire un peu partout (SMA Ferber...), un robot/agent autonome se doit d'avoir une représentation de son environnement. J'avais donc envisagé il y a longtemps, d'utiliser le robot Sphero afin d'établir une cartographie de l'environnement en le faisant se balader dans l'environnement, en récupérant ses coordonnées, et en notant les points de collision. Cela pourrait permettre, par exemple à déterminer si une pièce est rangée et s'il faut envoyer d'autres robots autonomes pour la ranger.

Exemple d'application au projet Smag0 : Sphero établit une cartographie un jour où la chambre est rangée et la stocke comme étant la cartographie de référence avec points de collision pour les pieds de meubles, et autres objets. Lorsque les jours suivants, Sphero repasse, on compare les deux cartographies, si les points de collision se sont déplacés : les objets ont bougé, et il faut envisager de les ranger, ou déterminer si leur nouvelle position est respectable.

Après cette brève introduction, passons au fourneau :


LA RECETTE DU SPHERO-CARTO.
Ingrédients :
- 1 script sphero.js permettant d'accéder au fonctionnalités du robot Sphéro : https://github.com/orbotix/sphero.js  (les fonctionnalités sont là : https://github.com/orbotix/sphero.js/blob/master/lib/devices/sphero.js )
- 1 serveur node.js
- quelques workers JS...


"C'est dans les vieux pots qu'on fait la meilleure soupe"
Pensons maintenant notre appli comme un système multi-agents, comme des programmes autonomes qui communiquent entre eux, nous aurons par exemple :
- un module (ou worker en javascript) qui s'occupera du serveur de fichier,
- un autre de la gestion des commandes du robot sphero,
- un autre de l'interface visuelle,
- un autre s'occupera de la conception de la carte,
- on pourra en trouver un qui se chargera du stockage de l'information,
- un déterminera l'algorithme à utiliser pour une meilleure exploration de l'environnement...
- ... (on pourra en ajouter d'autre selon le besoin et les fonctionnalités envisagées)


Le serveur de fichier : 
Commençons par installer nodejs si ce n'est pas encore fait, puis installez le module sphero : "$ npm install sphero" comme préconisé ici https://github.com/orbotix/sphero.js

le module socket.io et le module keypress "npm install socket.io",  `npm install keypress`

Ensuite, je me suis basé sur le tutoriel du nouveau site P5.js pour l'interaction entre le serveur node.js et le module d'affichage p5.js : http://p5js.org/tutorials/ ou https://github.com/processing/p5.js/wiki/p5.js,-node.js,-socket.io

Choix a faire : Socket ? worker ?

code  de base du serveur serveur.js , à lancer avec la commande : node serveur.js


// http://smag0.blogspot.fr/2015/11/sphero-carto.html
// HTTP Portion
var http = require('http');
// URL module
var url = require('url');
var path = require('path');
// Using the filesystem module
var fs = require('fs');
// make sure you install this first - `npm install keypress`
var keypress = require("keypress");
var server = http.createServer(handleRequest);
server.listen(8080);
console.log('Server started on port 8080');
//SPHERO
var sphero = require("sphero");
var orb = sphero("COM3");
var stop = orb.roll.bind(orb, 0, 0),
  roll = orb.roll.bind(orb, 150);
var detectionCollisionInterval; //interval pour la detection de collision
var collisionBool=0;
var xSphero,ySphero=0;
var direction=0;
function handleRequest(req, res) {
  // What did we request?
  var pathname = req.url;
  // If blank let's ask for index.html
  if (pathname == '/') {
    pathname = '/index.html';
  }
  // Ok what's our file extension
  var ext = path.extname(pathname);
  // Map extension to file type
  var typeExt = {
    '.html': 'text/html',
    '.js': 'text/javascript',
    '.css': 'text/css'
  };
  // What is it?  Default to plain text
  var contentType = typeExt[ext] || 'text/plain';
  // User file system module
  fs.readFile(__dirname + pathname,
    // Callback function for reading
    function(err, data) {
      // if there is an error
      if (err) {
        res.writeHead(500);
        return res.end('Error loading ' + pathname);
      }
      // Otherwise, send the data, the contents of the file
      res.writeHead(200, {
        'Content-Type': contentType
      });
      res.end(data);
    }
  );
}
// WebSocket Portion
// WebSockets work with the HTTP server
var io = require('socket.io').listen(server);
var socketA;
// Register a callback function to run when we have an individual connection
// This is run for each individual user that connects
io.sockets.on('connection',
  // We are given a websocket object in our function
  function(socket) {
    console.log("We have a new client: " + socket.id);
socketA=socket;
    // When this user emits, client side: socket.emit('otherevent',some data);
    socket.on('mouse',
      function(data) {
        // Data comes in as whatever was sent, including objects
        console.log("Received: 'mouse' " + data.x + " " + data.y);
        // Send it to all other clients
        socket.broadcast.emit('mouse', data);
        // This is a way to send to everyone including sender
        // io.sockets.emit('message', "this goes to everyone");
      }
    );
    socket.on('color',
      function(data) {
        // Data comes in as whatever was sent, including objects
        console.log("Received: 'color' " + data.r + " " + data.g + " " + data.b);
        orb.color({
          red: data.r,
          green: data.g,
          blue: data.b
        });
        // Send it to all other clients
        // socket.broadcast.emit('mouse', data);
        // This is a way to send to everyone including sender
        // io.sockets.emit('message', "this goes to everyone");
      }
    );
    socket.on('start',
      function() {
        // Data comes in as whatever was sent, including objects
        console.log("Received: 'start' ");
        start();
      }
    );
    socket.on('stop',
      function() {
        // Data comes in as whatever was sent, including objects
        console.log("Received: 'stop' ");
        clearInterval(detectionCollisionInterval);
        orb.roll(0, 0);
      }
    );
    socket.on('startCalib',
      function() {
        // Data comes in as whatever was sent, including objects
        console.log("Received: 'startCalib' ");
        console.log("::START CALIBRATION::");
        orb.startCalibration();
      }
    );
    socket.on('stopCalib',
      function() {
        // Data comes in as whatever was sent, including objects
        console.log("Received: 'stopCalib' ");
        initialiseLocator();
        console.log("::FINISH CALIBRATION::");
        orb.finishCalibration();
      }
    );
    socket.on('disconnect', function() {
      console.log("Client has disconnected");
    });
  }
);
////////////////////////////////
// SPHERO
////////////////////////////////
orb.connect(function() {
  listen();
  orb.color("green");
  //option configurelocator
  initialiseLocator();
  orb.getBluetoothInfo(function(err, data) {
    console.log("bluetooth info fetched");
    if (err) {
      console.error("err:", err);
    }
    console.log("data:", data);
  });
   orb.detectCollisions();
  // orb.streamVelocity();
  // orb.streamGyroscope();
  var opts = {
    n: 200,
    m: 1,
    mask1: 0x00000000,
    pcnt: 0,
    mask2: 0x0D800000
  };
  orb.setDataStreaming(opts);
  orb.on("velocity", function(data) {
    console.log("::STREAMING VELOCITY::");
    console.log("  data:", data);
  });
  orb.on("dataStreaming", function(data) {
    //console.log("streaming data packet recieved");
 //  console.log("  data:", data);
 xSphero=data.xOdometer.value;
 ySphero=data.yOdometer.value*-1;
 collisionBool=0;
    console.log(data.xOdometer.value+" "+data.yOdometer.value);
 var dataToSend = {
    x: xSphero,
    y: ySphero,
z: collisionBool // 0 car pas de collision
  };
 socketEmit("position", dataToSend);
  });
  orb.on("gyroscope", function(data) {
    console.log("::STREAMING GYROSCOPE::");
    console.log("  data:", data);
  });
  orb.on("collision", function(data) {
    console.log("collision detected");
   // console.log("  data:", data);
    orb.color("red");
    collisionBool=1;
 var dataToSend = {
    x: xSphero,
    y: ySphero,
z: collisionBool // 0 car pas de collision
  };
 socketEmit("position", dataToSend);
    setTimeout(function() {
      orb.color("green");
   collisionBool=0;
    }, 1000);
  });
});
function socketEmit(entete , data){
if(socketA!=null){
socketA.emit(entete, data);
}
};
function start() {/*
orb.roll(200, direction);
//Determinons les premieres limites
//limite haute
while(collisionBool==0){
setInterval(function() {
orb.roll(200, direction);
}, 2000);
}
direction=direction*-1; //demi-tour
//limite basse
while(collisionBool==0){
setInterval(function() {
orb.roll(200, direction);
}, 2000); 
}
*/
if(collisionBool==0){
detectionCollisionInterval =setInterval(function() {
   //direction = Math.floor(Math.random() * 360);
    orb.roll(150, direction);
  }, 2000);
}else{
console.log("collision ne peut avancer");
direction = Math.floor(Math.random() * 360);
}
  // roll orb in a random direction, changing direction every second
 /* detectionCollisionInterval = setInterval(function() {
    var direction = Math.floor(Math.random() * 360);
    orb.roll(100, direction);
    //  readLocator()
  }, 2000);*/
};
function initialiseLocator() {
  var opts = {
    flags: 0x01,
    x: 0x0000,
    y: 0x0000,
    yawTare: 0x0
  };
  orb.configureLocator(opts, function(err, data) {
    console.log(err || "CONFIGURE LOCATOR data: " + data);
  });
  orb.setHeading(0, function(err, data) {
      console.log(err || "Heading réglé sur 0: " + data);
    });
direction=0;
};
function readLocator() {
  orb.readLocator(function(err, data) {
    if (err) {
      console.log("error: ", err);
    } else {
      console.log("dataLocator:");
      console.log("  xpos:", data.xpos);
      console.log("  ypos:", data.ypos);
      console.log("  xvel:", data.xvel);
      console.log("  yvel:", data.yvel);
      console.log("  sog:", data.sog);
      console.log(data);
      console.log(data[0]);
      console.log("");
    }
  });
};
function handle(ch, key) {
  var stop = orb.roll.bind(orb, 0, 0),
    roll = orb.roll.bind(orb, 60);
  if (key.ctrl && key.name === "c") {
    process.stdin.pause();
    process.exit();
  }
  if (key.name === "e") {
    orb.startCalibration();
  }
  if (key.name === "q") {
    orb.finishCalibration();
  }
  if (key.name === "up") {
    roll(0);
  }
  if (key.name === "down") {
    roll(180);
  }
  if (key.name === "left") {
    roll(270);
  }
  if (key.name === "right") {
    roll(90);
  }
  if (key.name === "space") {
    stop();
    clearInterval(detectionCollisionInterval);
  }
}
function listen() {
  keypress(process.stdin);
  process.stdin.on("keypress", handle);
  console.log("starting to listen for arrow key presses");
  process.stdin.setRawMode(true);
  process.stdin.resume();
}


fichier sketch.js

//les exemples pour SPHERO : https://github.com/orbotix/sphero.js/blob/master/examples/
//https://github.com/orbotix/sphero.js

/*
 * @name Slider
 * @description You will need to include the 
 * <a href="http://p5js.org/reference/#/libraries/p5.dom">p5.dom library</a>
 * for this example to work in your own project.<br><br>
 * Move the sliders to control the R, G, B values of the background.
 */
var rSlider, gSlider, bSlider,speedSlider;
var myDiv0;
var rougeDiv;
var vertDiv;
var bleuDiv;
// Keep track of our socket connection
var socket;
var xSphero, ySphero;
var positionsSphero = [];
var positionSphero;

function setup() {
  // create canvas
  createCanvas(windowWidth, windowHeight);
  background(0);
  positionSphero = createVector(0, 0, 0);
  // Start a socket connection to the server
  // Some day we would run this server somewhere else
  socket = io.connect('http://localhost:8080');
  // We make a named event called 'mouse' and write an
  // anonymous callback function
  socket.on('mouse',
    // When we receive data
    function(data) {
      console.log("Got: " + data.x + " " + data.y);
      // Draw a blue circle
      fill(0, 0, 255);
      noStroke();
      ellipse(data.x, data.y, 80, 80);
    }
  );

  socket.on('position',
    // When we receive data
    function(data) {
      console.log("Position: " + data.x + " " + data.y + " " + data.z);
      // Draw a blue circle
      // fill(100, 100, 255);
      // noStroke();
      // ellipse(data.x, data.y, 10, 10);
      xSphero = data.x;
      ySphero = data.y;
      collision = data.z;
      positionSphero = createVector(xSphero, ySphero, collision);
      append(positionsSphero, positionSphero);
    }
  );

  textSize(15)
  noStroke();

  // create sliders
  rSlider = createSlider(0, 255, 255);
  rSlider.position(720, 20);
  gSlider = createSlider(0, 255, 230);
  gSlider.position(720, 50);
  bSlider = createSlider(0, 255, 107);
  bSlider.position(720, 80);
  speedSlider= createSlider(0, 255, 66);
  speedSlider.position(720, 110);

  //boutons
  button = createButton('start Calibration');
  button.position(20, 120);
  button.mousePressed(startCalib);
  button = createButton('stop Calibration');
  button.position(150, 120);
  button.mousePressed(stopCalib);
  button = createButton('start');
  button.position(20, 150);
  button.mousePressed(start);
  button = createButton('stop');
  button.position(100, 150);
  button.mousePressed(stop);
    button = createButton('clear');
  button.position(180, 150);
  button.mousePressed(clear);

  //affiche
  rougeDiv = document.getElementById("rouge");
  vertDiv = document.getElementById("vert");
  bleuDiv = document.getElementById("bleu");
  xDiv = document.getElementById("positionX");
  yDiv = document.getElementById("positionY");
}

function draw() {
  var r = rSlider.value();
  var g = gSlider.value();
  var b = bSlider.value();
  var speed=speedSlider.value();
  background(r, g, b);
  text("red", 800, 20);
  text("green", 800, 50);
  text("blue", 800, 80);
   text("speed", 800, 110);
   
  // console.log(r, g, b);
  if ((r != rougeDiv.innerHTML) || (g != vertDiv.innerHTML) || (b != bleuDiv.innerHTML)) {
    rougeDiv.innerHTML = r;
    vertDiv.innerHTML = g;
    bleuDiv.innerHTML = b;
    sendRGB(r, g, b);
  }
  xDiv.innerHTML = xSphero;
  yDiv.innerHTML = ySphero;
  translate(width / 2, height / 2);
  fill(0);
  ellipse(xSphero, ySphero, 10, 10);
  for (i in positionsSphero) {
    var position = positionsSphero[i];
    if (position.z == 0) {
      fill(0, 255, 0);
    } else {
      fill(255, 0, 0);
    }
    ellipse(position.x, position.y, 3, 3);
  }
}


function start() {
  console.log("start p5");
  socket.emit('start', null);
}

function stop() {
  console.log("stop p5");
  socket.emit('stop', null);
}

function clear() {
  console.log("clear");
  positionsSphero = [];
  positionSphero = createVector(0, 0, 0);
 // socket.emit('clear', null);
}

function startCalib() {
  console.log("start calib");
  socket.emit('startCalib', null);
}

function stopCalib() {
  console.log("stop calib");
  socket.emit('stopCalib', null);
}


/*
function mouseDragged() {
  // Draw some white circles
  fill(255);
  noStroke();
  ellipse(mouseX, mouseY, 80, 80);
  // Send the mouse coordinates
  sendmouse(mouseX, mouseY);
}*/
//ENVOI de la couleur
function sendRGB(r, g, b) {
  // Make a little object with rgb 
  var data = {
    r: r,
    g: g,
    b: b
  };
  // Send that object to the socket
  socket.emit('color', data);
}
// Function for sending to the socket
function sendmouse(xpos, ypos) {
  // We are sending!
  console.log("sendmouse: " + xpos + " " + ypos);

  // Make a little object with  and y
  var data = {
    x: xpos,
    y: ypos
  };

  // Send that object to the socket
  socket.emit('mouse', data);
}


fichier index.html

 <!DOCTYPE html>
<html>
  <head>
    <meta charset="UTF-8">
    <title>Sphero</title>
    <script src="libraries/p5.js" type="text/javascript"></script>

    <script src="libraries/p5.dom.js" type="text/javascript"></script>
    <script src="libraries/p5.sound.js" type="text/javascript"></script>

    <style> body {padding: 0; margin: 0;} canvas {vertical-align: top;} </style>

   <!-- <script language="javascript" type="text/javascript" src="//cdnjs.cloudflare.com/ajax/libs/p5.js/0.2.9/p5.min.js"></script>-->
    <script language="javascript" type="text/javascript" src="sketch.js"></script>
    <script language="javascript" type="text/javascript" src="/socket.io/socket.io.js"></script>
  </head>
  <body>
  <!-- <div id="connected" style="width:100px;height:100px">not connected</div> -->
  <div id="rouge">r</div>
  <div id="vert">b</div>
  <div id="bleu">v</div>
  <div id="positionX">X</div>
   <div id="positionY">Y</div>
  </body>
</html>

le code est disponible là : https://drive.google.com/file/d/0B0zEK4yLB5C6TUhLc0FRbVVKMVU/view?usp=sharing


Pour la gestion des webworkers avec nodejs : npm install webworker