02/09/2020

Create a Popock module for Holacracy4.0 Tension

In this tutorial, we will see how to build your own module for Popock webApp. 

The source code of the project is on github ( https://github.com/scenaristeur/solid-vue-panes/ ) .

Popock is build as a portal with different modules (inbox, chat, databrowser and many more) that uses Solid LinkedData platform as a backend.

 You can use Popock  at https://scenaristeur.github.io/solid-vue-panes

 Popock is one of the first Vuejs app I build, after playing a lot with Lit-Element (ex Polymer) webcomponents.

Solid LinkedData platform is a backend i really enjoy as one one the core principe is to allow anyone to store its data anywhere he want... 

And link this data to other people or organization data without any third party.

In this tutorial, we will create a first basic Solid Interaction, but before that lets retrieve Popock source code on your machine and create some basic file to host our module.

Then for the module, we will take the example of a simple form that store an Holacracy Tension on a SolidPod. ( Holacracy is a method of management that decentralize the power but it's not the purpose of this tuto. This tutorial is just to show you how to create a VueJs/Solid Module on Popock.

To understand what we do here, some html/css/javascript knowledge could be a very good start point, but we will try to make a tutorial as simple as possible, so if you just know how to use commandline to create files & folders on your machine, you should be able to follow what we talk about ;-).

 THis tutorial has benn tested on Windows10 & Linux Mint 19.2. If you encounter some issue, or have any question,  please share it Solid Forum.

Prepare your Developer Environnement

 Install if you don't have it already : 

 Clone the repository (project source code)

Open a command line window or a terminal and  use git clone to get project source code 

git clone https://github.com/scenaristeur/solid-vue-panes.git

cd to the solid-vue-panes just created folder 

cd solid-vue-panes

The data structure  of the project should look something like that 
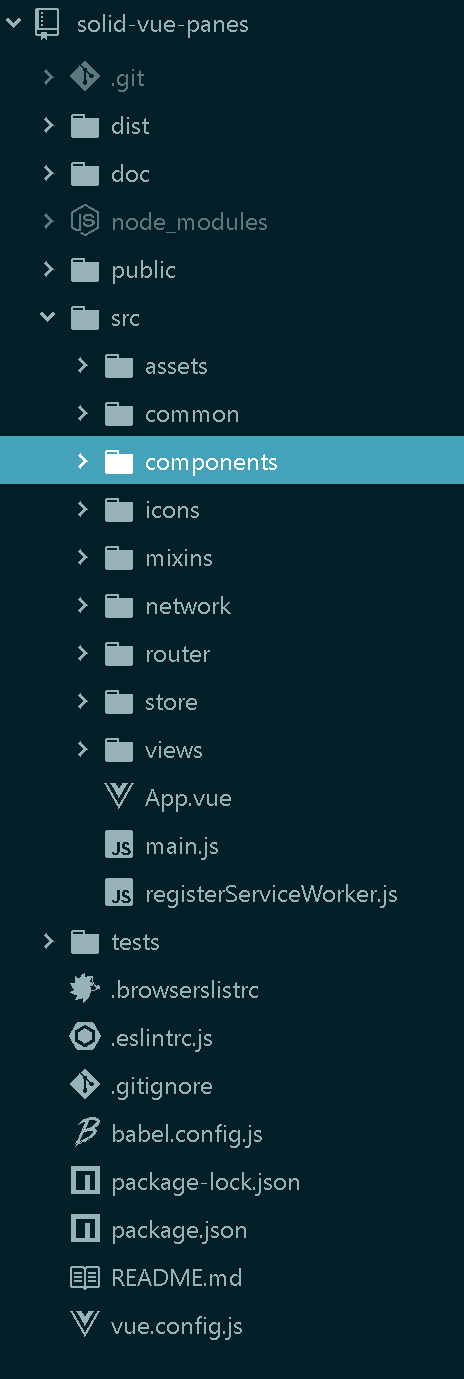
As lot of nodejs projects, the node_modules folder only appears when you type

 npm install

so please type it to install project dependancies edicted in the package.json...

Some warning can be shown during dependencies installationbut that should end with something like 

xxx packages installed 

If everyting is ok we can go futhrtmore, but if you encountered any problem or have question, remember to use the forum.

If everything is 'OK' just start the development server with 

npm run serve


 Create the Tension-Module files

  1. create 
  2. view

 1. First, in the src/components/ folder, create a folder named "tension" or anyother name, because at he end of this tutorial, the module should have been created...

This is where the major part of our module will reside, but to display it we will create a simple view that represent the root of our module. 

In the src/views/ folder, please create our TensionView.vue file.

You can duplicate the content the src/view/ModeleView.vue to get the starting content : 

src/views/TensionView.vue

<template>
  <div class="tension-view">
<!--  <Component /> -->
</div>
</template>

<script>
// @ is an alias to /src

export default {
  name: 'TensionView',
  /*  components: {
  'Component': () => import('@/components/Component'),
},*/
}
</script>
<style>
.tension-view {
  text-align: left;
}
</style>


12/06/2020

Semapps to visjs


1 requete

```
  const rawResponse = await fetch(this.params.source, {
    method: 'POST',
    headers: {
      'Accept': 'application/ld+json',
      //  'Content-Type': 'application/json'
    },
    body: this.params.query
  });
  const triples = await rawResponse.json();
  console.log(triples);

```

une fois que tu recupéré tes triples

````
  triples.forEach((t, i) => {
            let n_sub = {id: t.subject.value, label: app.localName(t.subject.value), title: t.subject.value}
            app.addNodeIfNotExist(n_sub)
            let n_obj = {id: t.object.value, label: app.localName(t.object.value), title: t.object.value}
            app.addNodeIfNotExist(n_obj)
            let edge = {from: n_sub.id, to: n_obj.id, label: app.localName(t.predicate.value), title: t.predicate.value}
            /*  app.network.body.data.edges.update(edge)*/
            this.addEdgeIfNotExist(edge)
            this.network.fit();
          });


```

02/05/2020

Solid & the Decentralized Web

  1. What is the Solid Project ?


    Well first,
    there are lot of things whose name is Solid on the net, and in computer programming too...
    but the one we will discuss here is the project launched by Sir Tim Berners-Lee (the man known as the inventor of web in 1989).

    Sure that it's hard to say one man invented the web, as there was many people that worked on it, but Tim wrote an important part to describe all you use each day.

    Working at CERN, he proposed some tools to facilitate sharing and updating information among researchers, by making first HTML pages, & describing how the links works...

    His goal was to provide each person a way to share what information he want.

    From this time, its "invention" has been reused a lot until now and many businesses use it...

    BUT,
    as anyone knows, some companies use those technologies, but the user is not the owner of its data. Those companies uses your data, to show you ads that could interest you, sell your data...


    As the director of the W3C consortium, Tim always applied to provide ways to share informations and to connect (LinkedData) them and now he want to revert the tendance.

    The goal of Solid is to give back to each one a way to manage its data, to decide who he want to share one part of information.

    To do that, Tim created the company Inrupt to help the Solid Project.

    To know more about the Solid philosophy, check the Wikipedia page [ English ] [ French ]
    or the SolidProject
    an old page describing the Solid project


    The Community Forum is a good start and the newcomers are always welcomed to ask questions and
    more technical question can also be asked on gitter/Solid/chat
  2.  How Solid Works ?

    Building apps on Solid is really different as building apps in other ways. Whereas in current ways, data or information are stored in databases.
    In the Solid philosophy, each user store its data on a POD and authorize apps to read its data or not.
    For example, we could imagine a service provider that


18/01/2020

La Galaxie Solid

Je vais vous emmener vers une nouvelle galaxie, la Galaxie Solid.


Dans cette galaxie, approchons-nous de cette petite planète que nous voyons là-bas...

Elle se nomme Provider One.


Sur cette planète, chaque nouvel arrivant se voit attribuer une petite parcelle de terrain pour en faire ce que bon lui semble.


En faire ce que bon lui semble, comme par exemple, planter des carottes, des pommes, faire une piscine, une Tour Eiffel, monter un business, créer un château...


Vous savez, comme dans "Minecraft", ou d'autres jeux courants, comme "Farm machin", ou le vieux "Sim city"...

Voilà, en gros, chacun peut avoir un ou plusieurs espaces où il y fait ce qui lui plait, et dans votre parcelle, vous choisissez ce que vous exposez aux autres grâce aux espaces "Privé" & "Public" définis par défaut sur votre parcelle. Vous pouvez aussi definir des groupes d'utilisateurs et des niveaux d'accès. Nous reviendrons sur ces espaces.

C'est vous qui décidez à qui vous donnez l'accès pour visiter votre château ou venir prendre des pommes.

Mais attention, il y a une petite différence par rapport à ce que l'on a l'habitude de voir : ce n'est pas parce que quelqu'un vous prend des pommes que vous en avez moins.
En fait c'est plutôt comme si elles étaient dupliquées ! Elles sont disponibles ppour les autres, mais vous les avez

Par exemple, si j'ai un petit creux


Installation du Blog Plume sur mon POD Solid

Solid ? Plume ?

https://forum.solidproject.org/t/solid-plume-simple-blog-app/1681/71

Solid copy https://otman.solid.community/public/solid-file-client/examples/copy/


```
I’ve written an example copy app which can be used to install plume easily. It is based on the new solid-file-client which will hopefully be released soon, so it will likely be integrated in solid-filemanager in the future.

Installing

Open Solid Copy (currently available here 6. In the future likely on the solid-file-client website)
Copy from https://otman.inrupt.net/public/solid-plume-0.11/ 4
To https://your-pod.example.org/public/plume/ 2
Wait until it is finished…
Then you need to edit and rename config-example.txt. For instance with solid-filemanager:
Now plume should be installed on your pod and you can open plume in your browser (/public/plume/ without index.html at the end).
@happybeing If you want to be sure, that Solid Copy and the solid-plume-0.11 links are persistent, I’d suggest you to copy them to your pod. It could happen that they get deleted while I test stuff, or when I need more storage space…
```

Solid copy https://jeff-zucker.github.io/solid-file-client/docs/examples/

14/09/2019

La Barrière LEGO avec telecommande - Arduino

Cet article fait suite à l'article La Barrière LEGO

Car c'est bien beau d'avoir une barrière LEGO qui se lève à l'approche d'un véhicule, seulement le problème, c'est une fois que l'on est passé, comment on fait pour revenir, car il n'y a pas de capteur de l'autre côté de la barrière...

La solution est d'utiliser une télécommande, sur laquelle nous utiliserons deux boutons... un pour lever la barrière et l'autre pour la baisser !

<video>

Prenez maintenant la télécommande et son capteur fournis dans le kit (voir  l'article La Barrière LEGO pour vous procurer le kit )


Sur la plaque du capteur infrarouge, repérez les broches S et -

PINDescriptionCouleur du câbleConnexion vers la carte ARDUINO
SSortie des donnéesmarronD11
3.3 - 5Vrouge VCC  / 5V
-0Vnoir GND

--> Utilisez les câbles fournis avec la télécommande et reliez
la pin S du capteur à la pin D11 de la carte Arduino
la pin du milieu du capteur à la pin 5V / VCC de la carte Arduino
la pin - du capteur

<troisphotos branchements>


Installez la librairie IRremote et ouvrez l'exemple IRrecvDemo
<trois photos install>

Nous n'allons pas nous servir du code hexadécimal de la touche, mais son code décimal. Pour ce faire, ajoutez la ligne
 Serial.println(results.value);

comme indiqué dans le code ci-dessous :

#include <IRremote.h>
int RECV_PIN = 11;
IRrecv irrecv(RECV_PIN);
decode_results results;
void setup()
{
  Serial.begin(9600);
  // In case the interrupt driver crashes on setup, give a clue
  // to the user what's going on.
  Serial.println("Enabling IRin");
  irrecv.enableIRIn(); // Start the receiver
  Serial.println("Enabled IRin");
}
void loop() {
  if (irrecv.decode(&results)) {
    Serial.println(results.value, HEX);
Serial.println(results.value);
    irrecv.resume(); // Receive the next value
  }
  delay(100);
}

Enregistrez ce code sous le nom de "Test_Telecommande" et téléverser-le sur la carte.


Ouvrez le moniteur série (dans le menu Outils) et appuyez alternativement sur les touches "Fleche Haut" et "Fleche Bas" de la télécommande.
Attention, si vous appuyez trop longtemps sur une touche, il peut arriver que les codes parasites "FFFFFFFF" et "4294967295", mais nous allons les gérer


<photo codes>

A chaque appui de touche, vous devriez voir apparaître un code correspondant à la touche appuyée . Moi j'ai pour :

Flèche HAUTFlèche BAS
code hexadécimalFF18E7FF4AB5
code décimal1671805516730805

Notez les codes que vous affiche le moniteur, ils peuvent être différents des miens !


Modifiez maintenant le code de la manière suivante pour détecter l'appui sur les deux flèches "HAUT" et "BAS".


#include <IRremote.h>
int RECV_PIN = 11;
IRrecv irrecv(RECV_PIN);
decode_results results;
void setup()
{
  Serial.begin(9600);
  // In case the interrupt driver crashes on setup, give a clue
  // to the user what's going on.
  Serial.println("Enabling IRin");
  irrecv.enableIRIn(); // Start the receiver
  Serial.println("Enabled IRin");
}
void loop() {
  if (irrecv.decode(&results)) {
    // Serial.println(results.value, HEX);
    // Serial.println(results.value);
    if (results.value == 16718055) {
      Serial.println("HAUT");
    } else if  (results.value == 16730805) {
      Serial.println("BAS");
    } else {
      Serial.println(results.value);
    }
    irrecv.resume(); // Receive the next value
  }
  delay(100);
}

Enregistrez votre programme (que l'on appelle également Sketch chez Arduino), et téléversez-le sur la carte. Ouvrez-le moniteur série et appuyez successivement sur les touches "HAUT" et "BAS". Ces deux mots devraient maintenant s'afficher dans le moniteur :

<photo moniteur haut bas>

On va maintenant utiliser deux fonctions leve_barriere() et baisse_barriere() dans lesquelles ont ajoutera le code contrôlant le servomoteur...

Modifiez maintenant le code comme suit :

00);


#include <IRremote.h>

int RECV_PIN = 11;

IRrecv irrecv(RECV_PIN);

decode_results results;

void setup()
{
  Serial.begin(9600);
  // In case the interrupt driver crashes on setup, give a clue
  // to the user what's going on.
  Serial.println("Enabling IRin");
  irrecv.enableIRIn(); // Start the receiver
  Serial.println("Enabled IRin");
}

void loop() {
  if (irrecv.decode(&results)) {
    // Serial.println(results.value, HEX);
    // Serial.println(results.value);
    if (results.value == 16718055) {
      leve_barriere();
    } else if  (results.value == 16730805) {
      baisse_barriere();
    } else {
      Serial.println(results.value);
    }
    irrecv.resume(); // Receive the next value
  }
  delay(100);
}

void leve_barriere(){
  Serial.println("HAUT dans la fonction");
}

void baisse_barriere(){
  Serial.println("BAS dans la fonction");
}


<photo leve barriere fonction>


Bien bien bien, pas mal jusque là... Il ne nous reste plus qu'à brancher le servomoteur comme dans l'article précédent  sur la PIN D9 et à ajouter le code qui gère ce moteur :

Comme on n'a pas utilisé les lignes "bleus et rouges" pour le 5V et le GRND, on va juxtaposer les câbles d'alimentation du moteur à ceux du capteur infra rouge .

<photos branchement moteur>

Un petit peu de copier/coller  depuis le code produit dans l'article précédent, et votre code pourrait ressembler à ceci :


#include <IRremote.h>
#include <Servo.h>

int RECV_PIN = 11;

IRrecv irrecv(RECV_PIN);

decode_results results;

/* Creation d'un objet Servo pour contrôler le servomoteur */
Servo mon_servo;

void setup()
{
  Serial.begin(9600);
  // In case the interrupt driver crashes on setup, give a clue
  // to the user what's going on.
  Serial.println("Enabling IRin");
  irrecv.enableIRIn(); // Start the receiver
  Serial.println("Enabled IRin");
  mon_servo.attach(9);
  mon_servo.write(180);
}

void loop() {
  if (irrecv.decode(&results)) {
    // Serial.println(results.value, HEX);
    // Serial.println(results.value);
    if (results.value == 16718055) {
      leve_barriere();
    } else if  (results.value == 16730805) {
      baisse_barriere();
    } else {
      Serial.println(results.value);
    }
    irrecv.resume(); // Receive the next value
  }
  delay(100);
}

void leve_barriere() {
  Serial.println("HAUT dans la fonction");
  mon_servo.write(90);
}

void baisse_barriere() {
  Serial.println("BAS dans la fonction");
  mon_servo.write(180);
}


ET voilà, notre Barrière LEGO télécommandée  !!!!!

<video >

Ajouter des leds pour indiquer si l'on peut avancer ou pas ???

Inspirez-vous de ce code  : un mix des exemples  Blink  et Fade  présents dans Fichier / Exmples / 01.Basic ou sur le site Arduino  --> vous aurez aussi des indications sur la manière de brancher vos leds si vous avez des doutes


Connectez vos led sur les pin 5 et 7 de l'Arduino
Sans oublier de les protéger par des resistances de 220 ohms ! 


int led_rouge = 5;
int led_verte = 7; 
void setup() {
  // initialize digital pin as an output.
  pinMode(led_rouge, OUTPUT);
  pinMode(led_vertee, OUTPUT);
}

// the loop function runs over and over again forever
void loop() {
  digitalWrite(led_rouge, HIGH);   
  digitalWrite(led_verte, LOW);  
  delay(1000);                      
  digitalWrite(led_rouge, LOW);   
  digitalWrite(led_verte, HIGH); 
  delay(1000);                      
}


25/06/2019

Joystick pour controller la souris


https://www.brainy-bits.com/arduino-joystick-tutorial/


// Arduino pin numbers
const int SW_pin = 2; // digital pin connected to switch output
const int X_pin = 0; // analog pin connected to X output
const int Y_pin = 1; // analog pin connected to Y output

void setup() {
  pinMode(SW_pin, INPUT);
  digitalWrite(SW_pin, HIGH);
  Serial.begin(115200);
}

void loop() {
//  Serial.print("Switch:  ");
//  Serial.print(digitalRead(SW_pin));
//  Serial.print("\n");
 // Serial.print("X-axis: ");
  Serial.print(analogRead(X_pin));
 // Serial.print("\n");
   Serial.print(",");
//  Serial.print("Y-axis: ");
  Serial.println(analogRead(Y_pin));
 // Serial.print("\n\n");
  delay(50);
}